Showing posts with label Guest Blogger Friday. Show all posts

7.06.2012

Guest Blogger Friday {#7}


Hi everyone! I'm Dorothy, from Crazy for Crust, where I bake you treats and share a slice of my life.

I'm so excited that Sophie asked me to guest post here today! Aren't her photos just fab? And she's a teenager and can bake amazingly. I mean, she makes things like 5-Minute Carrot Cake for One and Single Serving Deep Dish Chocolate Cookies. What's not to love?

If you read my blog, you'll know how much I love a good crust.

And yes, you'd be right when you say "there ain't no crust in those cookies!"

But I love cookies almost as much as I love pie!

Especially peanut butter cookies.

And, if you know me, you know I can't follow a recipe. I also cannot make anything twice and I am physically unable to make something without putting my own spin on it.

So, say I feel like a peanut butter cookie. Great, I'll make some.

But I can't just make a peanut butter cookie. I mean, they're super fab and all, but where's the fun in that?

I know, I'll add chocolate chips.

Still, not good enough.

Oooh, butterscotch. That's one of my new found loves and it goes with PB&C.

Still, it's not good enough.

So then I had to add toffee chips to this cookie.

And that made them juuuuust right. {Said in the Goldilocks voice.}


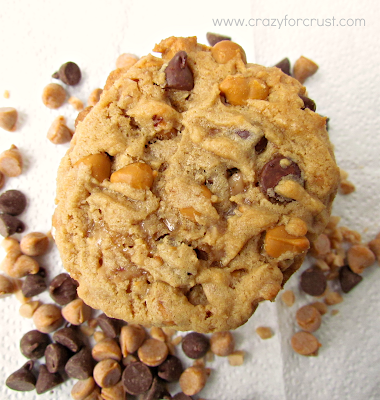
So, there you have it. A great not-just-a-peanut-butter peanut butter cookie.

I hope you'll come by and say hello. I promise to make you a pie. And bore you with tales of how my kid is insane and how I work out with aliens.


Thanks again for having me Sophie! Enjoy!


Peanut Butter Butterscotch Toffee Cookies

by Crazy for Crust
(Recipe adapted from Crisco)

Ingredients
  • ½ cup softened butter
  • ¾ cup peanut butter (I use creamy Skippy Naturals)
  • 1 ¼ cups firmly packed brown sugar
  • 3 tablespoons milk
  • 1 tablespoon vanilla
  • 1 egg
  • 2 cups flour
  • ¾ teaspoon baking soda
  • 1 cup chocolate chips
  • 1 cup butterscotch chips
  • 1 cup toffee bits
Instructions
  • Preheat oven to 350°. Line cookie sheets with parchment.
  • Mix butter, peanut butter, brown sugar, milk, and vanilla with a stand or hand-held mixer until just blended. Add egg and beat until incorporated.
  • Whisk baking soda and flour in a medium bowl. Add to wet ingredients and mix just until blended. Stir in chocolate chips, butterscotch chips, and toffee bits.
  • Scoop cookies onto prepared cookie sheets and press with a fork to make a crisscross pattern. (I used a 2 tablespoon cookie scoop.) Bake about 8 minutes just until set. Bottoms will slightly brown and centers may still look a little under baked. Let cool on cookie sheet for about 2 minutes, then remove to cooling rack to cool completely.
Powered by Recipage



Pin It!

6.29.2012

Guest Blogger Friday {#6}

Hello, My Happy Place readers! I’m Shatzi and I blog over at Love and Laundry.  I’m a stay at home mom of three awesome kiddos and I love learning and experimenting with new things.  My favorite things are sewing, cooking, crafting and reading. I blog all about what I’m up to.   Here are some of the things I’ve been doing lately:

post features for guest blogging

I’m so glad Sophie let me join you today. I love her blog – she is really inspiring to so many people. And I love her recipes! Especially her single serve desserts (who wouldn’t love a single serving of deep dish chocolate chip cookie? YUM!!)

If there is one thing I love, it’s chocolate.  Most of the time, if I have to choose between chocolate and something else, chocolate wins.  One of my favorite ways to have chocolate is a cup full of steamy hot chocolate on a cold winter night.  But it’s summer now and that won’t do.  So, today I’m going to share with you one of my new favorite summer dessert drinks. Frozen Hot Chocolate!

frozen hot chocolate

About a month ago, I took my kids to Dairy Queen for lunch.  I noticed that they had a frozen hot chocolate on the menu, so I had to try it.  It was yummy!  So good that I almost wished I never discovered it. I knew that my wallet was doomed to shrink to nothing by the end of the summer just from buying frozen hot chocolates.  That would never do, so I sought out to make an equally wonderful version at home.  In my opinion, this is way better than the DQ version. This recipe is really pretty fast and easy.  And a huge hit with my kids!

Here’s what you need:

frozen hot chocolate ingredients

3 squares of bakers chocolate (or 3 oz of chocolate chips)
2 teaspoons of cocoa (I haven’t tried it, but I’m sure you could substitute hot chocolate mix)
1/4 cup of sugar
2 cups of milk
About 3–4 cups of ice
{This recipe serves about 4-5 people}

First, melt the chocolate squares in the milk on low heat. When the chocolate starts to melt, add the sugar and stir well.

frozen hot chocolate step 1

After all of the chocolate is melted and it looks smooth, remove from the heat and let it cool down. 

After it’s cooled off, pour the chocolate and milk into a blender. Add the ice and cocoa powder and blend.

frozen hot chocolate step 2

And that’s it! Super easy and super delicious! It’s a perfect summer time treat without heating up the house.  And now I can enjoy the yumminess of hot chocolate all year long!

Thank you, Sophie, for letting me hang out here today.  

If you like what you see, you can keep up with me on Facebook, Pinterest, Twitter, and RSS.

--------------------------------------------------------------------------------------------

Doesn't that look SO good? I can't wait to make it! Thanks for coming on over today, Shatzi! Ya'll should go and check out her blog! It's completely adorable :) Have a great day! 
-Sophie


Pin It!

6.22.2012

Guest Blogger Friday {#5}

Hello wonderful people! I'm so happy Alyssa's here to share some yumminess with all of you while I leave for Victoria Falls today! Be sure to stop by her blog sometime and leave some blog love! 

Hi, I am Alyssa from What’s Cooking, Love?
I am so excited to be here guest posting at My Happy Place.
I love Sophie's blog, she has so many great desserts on there!! She is living in Africa with her parents as missionaries, what a great experience!

I am a wife to my wonderful husband and a mother to my 1 year old son.  I like to blog about cooking and love food!  My blog is about cooking easy, good food, using shortcuts and timesavers.  I also host a weekly link party, Showcase Your Talent Thursday.  I hope that you stop by and visit.  


If you've ever read my blog, you would know that one of my favorite flavor combinations is chocolate and peanut butter. When I saw a recipe for these oatmeal bars, I knew I had to try them.

These oatmeal bars were such a delicious combination of oats, chocolate, and peanut butter.  These are also pretty easy to make and are so tasty.  I made these when I met up with some friends and they all loved them. I really hope that you try these!

Peanut Butter and Chocolate Oatmeal Bars
(Recipe adapted from Kraft Food and Family Magazine, Spring 2012)

1 cup butter, softened
1 1/2 cups packed brown sugar
2 cups old-fashioned oats
2 cups flour
1 teaspoon baking soda
1 package (8 squares) of semi-sweet chocolate (can also use unsweetened chocolate)
3/4 cup creamy peanut butter

1.  Preheat the oven to 350 degrees.

2.  Beat the butter and brown sugar in a large bowl with a mixer until the mixture is combined.  In a separate bowl combine the oats, flour and baking soda.  then add that mixture into the butter and brown sugar mixture. 

3.  Press 3 cups of the mixture into the bottom of a 13x9 inch greased pan.

4.  Microwave the chocolate for 45 seconds, and then in 10 second increments until melted.  Stir in the peanut butter.  Carefully spread the chocolate and peanut butter over the crust.  Then sprinkle with the remaining oat mixture.  

5.  Bake for 22-25 minutes or until the edges are golden brown.  

Thank you so much to Sophie for allowing me to guest post!
I hope that you stop by and visit me at What’s Cooking, Love?!
You can also follow me on FacebookPinterest, or by RSS Feed
Thanks!


Pin It!

6.15.2012

Guest Blogger Friday {#4}

I've been jumping in excitement {not literally. But inside, yes.} to post today's guest blogger! It's Julie from White Lights on Wednesday! She's SO sweet and amazing and her recipes are awesome. I could go on. But really, I love her... In a non-creapy sort of way, that is. You could call us BFFS. As in "Blogging Friends Forever". You betcha! I just love how she made her recipe "Sophie-Appropriate". That's pure awesomeness right there. 

Hi Everyone!
I'm Julie from White Lights on Wednesday!
I'm really exciting to be on Sophie's blog today and meeting all of you!


Since we don't really know each other, and I'm totally awesome - ha! - here's a little about me.  I live in Arizona.  Yes, it's stupid hot in the summer.  I love to cook and bake.  I'm pretty much obsessed with freshly clean sheets, they're amazing!  I LOVE Love love to eat cookies.  And I like wine and whiskey.  Not together though...ewww.  


There.  Now we can be friends.  :)


To give you an idea of what goes on over at my blog, here are some of my readers' favorite posts.


(1) Thin Mint Knock Offs
(2) Chocolate Wasted Cake
(3) Get Organized: The Blog


Now, being addicted to Sophie's blog made it really easy for me to decide that I wanted to make cookies today.  The hard part was figuring out which ones to make.  There are so many endless possibilities.  


Then I remembered a post I saw a while ago.  All I had to do was make a minor adjustment so everything would be perfect for Sophie.  Of course I had to pay a little homage to one of my all time favorite dessert bloggers, Heather.


Chocolate Sprinkle Sandwich Cookies
From SprinkleBakes


Ingredients:
10 1/2 tablespoons unsalted butter, softened
1/2 cup granulated sugar
1/4 cup unsweetened cocoa powder  {Heather uses dark cocoa powder}
1/4 teaspoon baking soda
1/8 teaspoon salt
1 egg
1 teaspoon vanilla
1 1/4 cups all-purpose flour
1 cup rainbow jimmies/sprinkles
Twelve 6" to 8" lollipop sticks, optional


Directions:
  1. Line 2 baking sheets with parchment paper (or Sil-Pat); set aside.
  2. In a large bowl, beat butter on medium speed until creamy.  Add sugar, cocoa powder, baking soda, and salt.  Mix until well combined.
  3. Mix in the vanilla and egg.  Scrape the sides of the bowl as needed.  Mix in the flour.  Dough should not be sticky.
  4. Fill a small bowl with sprinkles.
  5. Measure out dough by level tablespoons.  Roll dough into a ball between your palms into a ball.  Roll dough in sprinkles until coated.  {I found it helped to gently drop the dough ball into the sprinkles to press them into the dough.}  Place sprinkle coated ball onto baking sheet.  Repeat with remaining dough.  Place in refrigerator for 30 minutes.
  6. Preheat oven to 375 degrees F.
  7. Bake for 12 minutes.  Cool on baking sheet for 2 minutes.  Remove cookies to wire rack and cool completely.
Filling:
8 tablespoons unsalted butter, softened
1 to 1 1/2 cups powdered sugar
1 teaspoon vanilla

Directions:
  1. Beat butter and powdered sugar in a large bowl with a hand mixer on low speed.  When almost incorporated, add vanilla and beat on high speed until light and fluffy.
  2. Transfer to a piping bag and fill cookies, or fill by spreading frosting on cookies with a small spatula.
Insert lollipop sticks into filling so that cookies stand on their side.  Eat and be happy!


I hope you'll try these cookies out.  They are seriously wonderful.
Colorful, chocolaty, almost cakey.  Happy.  Above all happy.

Thanks so much to Sophie for having me today. 
You make me smile and I'm glad to call you friend.


Pin It!

6.08.2012

Guest Blogger Friday {#3}

 Good morning everyone! As you may know, I was gone over the weekend to Windhoek and I scheduled this to post but accidentally clicked the wrong day! OOPS! SOO... Be sure to stop on by Angela's blog today to share some extra love! :)

Hey there! I'm Angela, from Angela's Adventures. I'm a multi-tasking mommy of two little ones and blogging is my creative outlet. I love to write about my daily life as a stay at home mommy, and also my crafting and cooking adventures. Feel free to pop on over and check out my latest projects! Today I'm super excited to be sharing a simple dessert with you all. The other night, I spontaneously made this for my family and they all (especially my 3 year old), loved it. When you read this recipe, I want you to remember that anyone can make something creative and cute. All you need to do is think outside of the box and have fun!

{Super Easy} Chocolate Banana Cream Triffles Put 4 graham crackers into a plastic bag and then crush with your hands until they resemble bread crumbs.
Add 2 tablespoons of melted butter to the bag. Reseal the bag and mix the graham cracker crumbs and butter around until thoroughly combined. Scoop the mixture into 4 glass dishes (I used wine glasses and they worked great). Lightly press the graham cracker crust into the dishes with your fingers.
In a blender, combine 8 large marshmallows and 1 banana. The marshmallows give an extra sweet flavor and they make the banana cream super smooth. 

Next, whip up a package of instant chocolate pudding according to the "pie" directions on the package. 
Layer the chocolate pudding and the banana cream on top of the graham cracker crust and then chill these tasty treats until you're ready to eat them.


I'm sure your family will love this simple recipe. And let's face it, anything in a glass dish (especially layered), looks fancy and extra delicious. Get creative. Have fun. Enjoy!
For more of my adventures, visit my blog. You can also find me on facebook and of course, Pinterest

Isn't that lovely and easy-peasy too? Love it! 
Also, be sure to check out her blog today, because not 
only is it awesome, but yours truly will
be sharing a recipe that you won't wanna miss… :)


Pin It!

6.01.2012

Guest Blogger Friday {#2} : Balsamic Chocolate Truffles

Good morning everyone! It's FRIDAY! Hallelujah. I love Fridays! Wanna know why? Well one, it's the last day of school for the week, and two, we have a guest blogger! I'm so excited to share my real life friend with you! Julia is so sweet and she just started her own little food blog! And so far, it's great! Be sure to stop by and leave a comment or even better, follow! You won't regret it:) 
Take it away, Julia! 

Hi! I’m Julia from{Whisk You Away…}! First of all, I want to acknowledge how grateful I am to Sophie and how honored I am that she invited me to post over here at her exceptional blog today :) I am ecstatic, as this is my first experience guestposting – Here Goes!


This is me! I am a 12 year old homeschooled girl adopted from Korea, living in Minnesota, and trying to live my life for the Lord's glory. As a child, you could expect to find me in the kitchen, pretending to have my own cooking show. In addition to my love of blogging and baking, I also enjoy ballet, photography, rain, walks, and France. I created Whisk You Away… this previous March, because I loved the idea of being able to jot down my findings as a foodie and other ideas and creations. My blog is Christian-based, and is where I share my repertoire of recipes, personal and in-the-kitchen experiences, and photographs. My goal for Whisk You Away is that in some small way, it would spread God's Word and everlasting love. Please drop in for a peek – I would love having you as a follower! Now, I wasn't about to say adieu before sharing with you a mouthwatering, special, sweet treat! These incredibly simple, yet fantastically flavorful truffles are a favorite of my family and friends! They will blow your mind. Bon Appetit!


Balsamic Chocolate Truffles
 8 ½ ounces dark chocolate, chopped
 ¼ cup heavy cream or half-and-half 
 1 tablespoon balsamicvinegar 
 ½ cup cocoa powder 

 Melt the chocolateand heavy cream in a double boiler* over hot but not simmering water. Place melted chocolate in a small bowl. Stir in the balsamic vinegar. Cool the chocolate in the refrigerator for 1 hour or more, until firm, but moldable. Usea teaspoon to scoop out chocolate. Use your fingertips to shape into balls about the size of a cherry. Set the chocolate balls on a parchment-lined trayor plate. Place the cocoa powder in a small, shallow dish. Place truffles oneat a time in the cocoa powder and roll around to coat. Then return the coated truffles to the tray or plate. Continue with remaining truffles. Place them in a serving dish or airtight package. *Not everyone has double boilers, right?! Well, making your own “double boiler” will suffice just as well! In this particular recipe, simply place a heat-proof bowl over a pot of hot water. Just make sure that the bottom of the bowl does not touch the water. 

 Well, that about wraps it all up! Thank you so very much, Sophie, for having me and I hope that y'all enjoyed my time here! I'd be ecstatic to hear from you! Blessings! ~Julia


Whisk Up! 


Pin It!

5.25.2012

Guest Blogger Friday {#1} : German Pancakes

We have a guest today! YAY! I'm so excited to have Shannon from Desperate Chefwife 
posting over HEEEYAHHHH today! Be sure to stop on by her blog! It's ADORABLE! 
She's so sweet and the recipes she shares are amazing!

- - - - - - - - - - - -  - - - - - - - - - - - - - - - - - - - - - - - - - - - - - - - - - - 
Hello everyone I am Shannon from Desperate Chefwife. My little cooking site features recipes that even the pickiest eaters will love, and the most inexperienced chefs can cook!  Here's me...


Oh wait, that is my puppy...her name is Lily, she is 5 months old, and she is a Yorkie Poo! Isn't she the cutest thing in the world!?
hem..hem...sorry.
Here's me
oh, and my super hot husband. We have been married for 2 years and still say "I love you" about 837 times a day. Our mission is to be newlyweds until the day we die. That's right, we are gonna pull some Notebook magic and die together so we don't have to live apart...
but that's getting into my weird dark side that has no place in breakfast food.
Anyyyway....
I'm so excited to be posting for you guys today. I am a big fan of  My Happy Place and love all the delicious recipes!
So I totally love breakfast. I have made over 100 different kinda of pancakes in the past year alone! There's just something fantastic about waking up to a homemade breakfast, and everyone totally loves you if you cooked it for them!
This is one of my go-to's for breakfast because it is easy, delicious, and actually healthy (that is until you melt butter, sprinkle powdered sugar, and drown syrup alllll over it.) Plus, you can make this savory or sweet, whatever you are in the wake-up mood for.
Oh and it will totally impress anyone you make this for, and make them love you.


German Pancakes
3 TBL Butter
3 eggs
1/2 cup flour
1/4 tsp salt
1/2 cup milk

Put the 3 TBL butter in a round glass pie pan and put that in the oven, then turn it on to 450 and let it melt while you do the rest of the steps.
In a bowl, whisk eggs, flour, salt and milk
whisk until frothy like this!
Let that sit until your butter is melted
pour the patter into the hot pan over the melted butter.
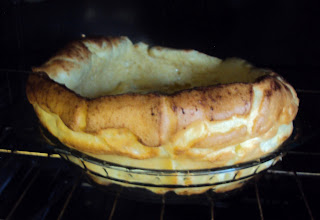
Bake for 12 minutes, and don't open the oven to check, it needs all the hot air, and it will come out like this
ta-da!
See, totally looks impressive and souffle-like, but so easy you can't mess it up.
It will deflate as soon as you pull it out of the oven, so don't worry
Cut it into quarters and serve with syrup, powdered sugar, or nutella
or sprinkle some cheese and bacon and peppers and you have a German Omlette
Oh and when everyone is so impressed and wants you to cook all the time
Come visit me at Desperate Chefwife, and get more fantabulous recipes
oh and don't forget to Follow me and Like me on Facebook!

- - - - - - - - - - - -  - - - - - - - - - - - - - - - - - - - - - - - - - - - - - - - - - - 

See, I told you! Isn't she awesome? :) 

I'm looking to schedule some more guest bloggers.
If you're interested, please feel free to drop me an email
Thanks!


Pin It!